
There are probably more how to guides on how to add a certificate to a vCenter, but here’s my go, again as a reminder to myself for the next time I try to rebuild my lab from scratch and forgetting how some things are done.
Problem
Firstly on the installation of your vCenter you gave it a DNS (and PTR record 🙂 if not read a previous blog of mine (shameless plug :-)) about why you should have done that.. https://www.gerjon.com/vmware/vmware-vcenter-7-0-no-healthy-upstream-server/
That vCenter now has an invalid certificate because it is deployed as part of vCenter and the root certificate is not trusted. you can ignore the error but you might get issues when uploading files (e.g. ISO files) to the data stores via the webbrowser.
This is the error you might see when connecting

To solve this error you can do one of three things:
- The first is buy a publicly trusted certificate and add that to your vCenter server.
- The second is download and install the used certificate so it is trusted by your browser (blog post is underway)
- The third solution would be to create a private certificate server and create a private self signed certificate.
This blog will focus on the third solution (because it’s my homelab, I wanted to test this, and private certificates are free :-)).
This post consists of three parts:
Solution Part 1:Install the Certificate services
Solution Part 2:Configure the Certificate services
Solution Part 3:Adding the certificate to vCenter
Solution Part 1:Install the Certificate services
First thing you need to do is install Active Directory Certificate Services. you can do this by running these two PowerShell command lets on a Windows 2016/2019/2022 server OS.
Two important things that are required for this to work:
- Before you install Active Directory Certificate Services, you must name the computer, configure the computer with a static IP address, and join the computer to the domain.
- To perform this procedure, the computer on which you are installing AD CS must be joined to a domain where Active Directory Domain Services (AD DS) is installed.
Type this command to install the certificate authority services.
| Add-WindowsFeature Adcs-Cert-Authority -IncludeManagementTools |
After AD CS is installed, type the following command and press ENTER.
| Install-AdcsCertificationAuthority -CAType EnterpriseRootCA |
You can also do this via the server manager wizard:
Start the server manager on the server you want to install the certificate services on and click on install roles and features:

Click next to start the installation

Chose the role-based or feature-based installation bullet.

Select the server to install the role on. I chose Gerjon-DC01 which is a Windows 2019 Core Server so I added it from the Gerjon-DC02 server.

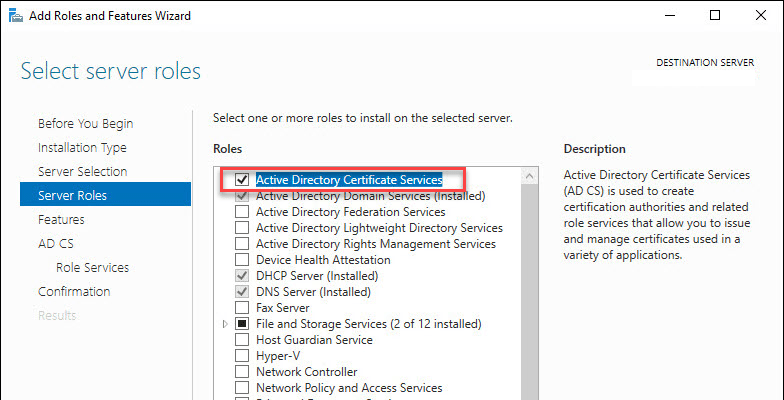
Select the role from the list.
Features are not required for the installation.

Click next.

Select the Certificate Authentication role and click next, read the confirmation and click finish. The installer will now run to install the role on the server.

Solution Part 2: Configure the Certificate services
After installation you can configure the role. The setup I made is just a root CA where all certificates are stored and created.
Pro Tip: In production environments it’s safer to create a separate server as CA root and use one or two intermediate servers for certificate creation. This has the same reason as go daddy and other public CA’s, because if the root CA is compromised al certificates are invalid but if a intermediate CA is compromised you only need to recreate the certificates created by that intermediate CA. In the future I’ll write a blog on CA and how to set it up in production, because this is interesting stuff and doing this wrong may cause headache in the future!
But as said for now we’ll do it the easy way :-).
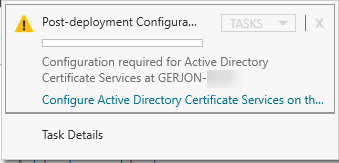
Click on the configure Active Directory Certificate services blue text.
Specify the credentials to configure Active Directory Certificate Services with. This account must be member of the Enterprise Administrators group to configure the Enterprise CA role.

I also chose the CA web enrollment role to be installed to have a nice website to create the certificates on but it can also be done via the MMC so it’s not required.

select the Enterprise CA role as we are using this in an Active Directory environment this works best.

Since it is the first server we are using for certificates in this domain the server is the Root CA.

On the private key window select new private key (as we are installing an new CA on a domain that doesn’t already have any CA installed).

For Cryptography, leave the settings to default and click Next.

On this page you see information on your CA name and distinguished name suffix. Click Next.

You can change the validity period of the cert to more than 5 years. We’ll leave it default for now.

On the Certificate database window, you can specify the certificate database location and certificate database log location. we’ll also leave this default, so click Next.

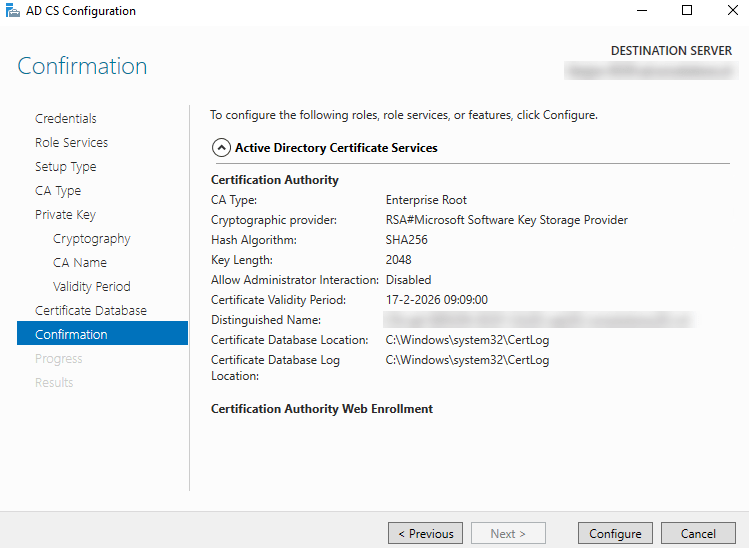
Verify the settings on Confirmation page and click Configure.
After configuring the settings you can start using the CA. so lets quickly move to part 3!
Solution part 3: Adding the certificate to vCenter
Because we created an Enterprise CA it automatically will deploy the root certificate to all Windows devices in the domain. You can check this by running manage computer certificates. You can see that a trusted Root Certificate is created with your CA name:

To start the certificate process log on to the vCenter environment and click on Administration.

Click on machine SSL certificate and chose actions and generate Certificate Singing Request (CSR).

Fill in the fields requested by the form.

The CSR is created and you can download it and/or copy it to the clipboard.

This is where the fun starts, because for some reason (i think because the vCenter appliance is LInux based) you cannot use the Certificate Authority snap in to activate the CSR. When you try to do this you get an error stating:
The request contains no certificate template information. 0x80094801 CERTSRV_E_NO_CERT_TYPE).

Reason for this is that when the certificate was generated by the vCenter appliance no template was chosen in the request so the Windows CA does not know what template is used for this certificate and will fail on this. Luckily you can also submit the request via command line where you can add the needed template.
Pro tip: for this to work you need the webserver template to be available within the certificate templates. you can check this by starting the CA MMC from the administrative menu and check if the certificate is available in certificate templates

To get the certificate signed via the command line you need to start an elevated command prompt on the CA server and run this command:
certreq -attrib "CertificateTemplate:WebServer" |
this will start a pop-up asking for the location of the CSR.

Next you select the CA to use for signing the CSR.

After that you are asked where to store the signed certificate.

After the signing process you see that a certificate is generated.

Next log on to the vCenter server and go to administration and then certificates again. Click on import and replace certificate.

You are prompted with a wizard for the import. Choose the bullet Replace with external CA certificate where CSR is generated from vCenter appliance. That’s because we did just that :-).

Next you are asked to import two files. One being the signed certificate and one being the root certificate (because vCenter is not windows it will not receive the root certificate automatically). Import the signed certificate and import the root certificate, watch out when you click replace vCenter will automatically reboot!

After the reboot you will have a trusted login to vCenter :-)!

Pro tip: if you don’t have an export of the root certificate start a elevated command prompt on the CA server and run this command:
| certutil -ca.cert root_certificate.cer |
This will create a certificate name root_certificate.cer that you can import, it also creates a visual output of the certificate so you can also copy paste that into the wizard.

You can also use this certificate to import on workstations and servers that are not linked to the domain that you used to create the certificate.
It’s been quite a ride to get this working but i hope it helps someone (other than me :-))