Recently I’ve been playing around with VMware Workstation 16 and found that installing Windows 11 is a bit more complex then next, next, finish mostly because of the TPM requirement that the OS has. So I wrote this post to help myself (and hopefully it will help you too) remember how to fix this. There are probably more posts regarding this subject (e.g. the VMware kb article https://kb.vmware.com/s/article/86207) but this is my take in this.
Issue
When you do the next, next finish scenario :-), you get this error when installing Windows 11 from the ISO.

Possible Solutions
First of you need to thick the requirements boxes for running Windows 11
- While installing a new Guest OS, Select the OS type as “Windows 10 and later x64”.
- Before starting the installation, Configure default settings of Virtual Machine to be created to match the minimum system requirements for Windows 11, more information can be found here. https://www.microsoft.com/en-in/windows/windows-11-specifications
To configure these settings go to the followings tabs
- To configure Processor and RAM requirements : Go to Guest VM settings -> Processors & Memory.
- For Storage memory: Go to Guest VM Settings -> Hard Disk -> Increase the Disk Size as per minimum requirement.
- Enable UEFI, Secure Boot capable: Go to Guest VM settings -> Advanced
There is more than one way to get Windows 11 running inside VMware Workstation.
- Use the Software feature by updating the vmx file, beware that this incorporates a performance penalty!
- Enabling Encryption on Guest VM and then adding vTPM device. Please note this will encrypt complete VM!
- Bypassing TPM check. This is the Microsoft way to bypass the check, beware that this is not supported by Microsoft and might cause your VM to miss updates in the future!
User the Software Feature
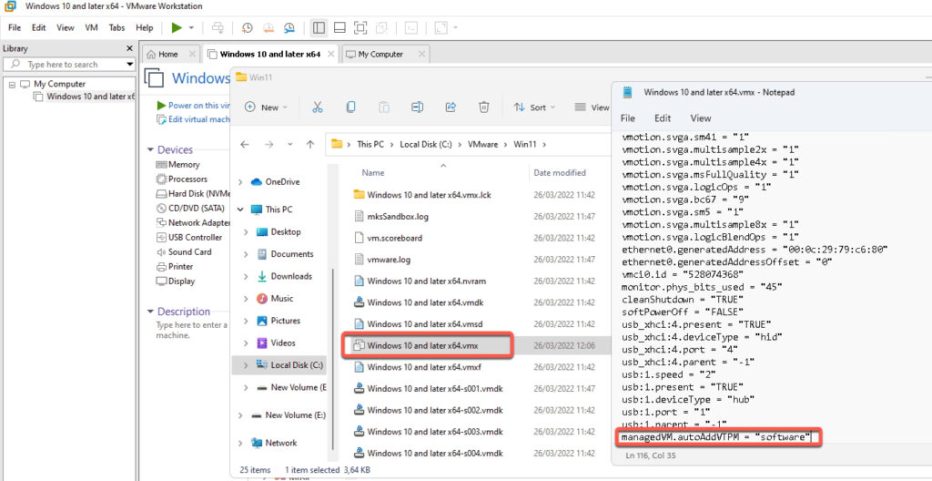
- Before starting the installation process. Edit the vmx file for the VM and add managedVM.autoAddVTPM = “software”
- After editing the vmx file, you need to restart Fusion/Workstation/Player.
- After restarting, start the Windows 11 VM and let the installation process continue.

Pro Tip: This feature is currently an experimental feature that boasts a reduced performance impact by employing a new encryption model as well as several new options for managing Fusion and Workstation installations at scale.
Enabling Encryption on Guest VM
This solution only works on Workstation Pro and Fusion (and your hardware needs to support vTPM, you can enable this in the BIOS). After creating the VM go the virtual machine settings and enable encryption:

After clicking on encrypt you get asked to type in a password. Keep this password safe because if you move the VM to another host you need to enter the password to get the VM up and running

After the encryption process completes, this should only take a minute because the disk that’s encrypted is empty 🙂 you can see the disk is encrypted.

Next step is to go to the hardware tab and add a TPM device.

After that start the VM and it should install Windows 11 just fine.
Bypass TPM check
Pro tip: This is the only way to run Windows 11 on Workstation Player and this will work on Workstation Pro and Fusion as well and as this makes your Windows 11 installation not supported so you might miss out on critical security updates in the future.
When you start installing Windows 11 you see this screen popping up when you start the installation

Next step is to press SHIFT+F10 then a command prompt will open

Type Regedit to open the registry. Browse to system->setup and create a key called Labconfig. in this key create 2 DWord entry’s
| Keyname | type | data |
| BypassSecureBootCheck | DWORD | 1 |
| BypassTPMCheck | DWORD | 1 |


You are then redirected to the installer again and you can run the installation as needed and it should work.
Hope this helps someone.
